Ground Shaker

From Dead Cells Wiki
Jump to navigation Jump to search

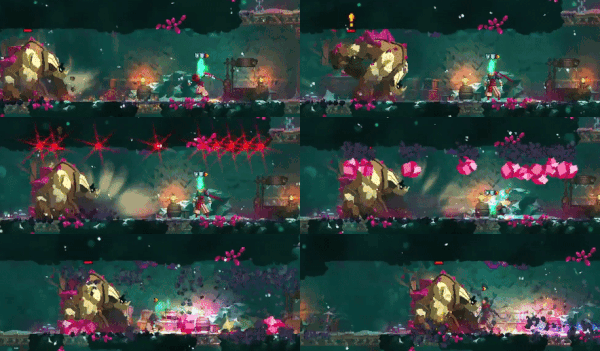
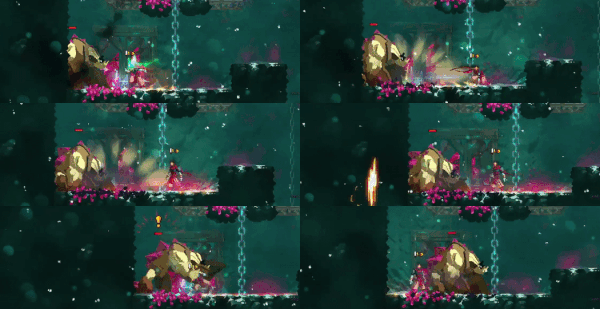
Ground Shakers are bulky, four-legged enemies found in the CavernRotG that have huge paws and an armored back. They are exclusive to the Rise of the Giant DLC.

Behavior[edit]

Ground Shakers are immune to stun. They also cannot be harmed from the back by any attack that does not ignore shields.

At melee range, it will perform a three-pound combo then a devastating ground slam. At a distance, it stomps and breaks rocks loose from the ceiling.

Moveset[edit]

Avalanche
  • Description: Stomps with its hind legs, causing rocks to fall from the ceiling.
  • Cannot be blocked or parried.
GroundShakerAvalancheTutorial.gif
Swipe combo
  • Description: Slashes at the front three times, then charges up for a powerful slam that sends a shockwave forward.
  • Melee attacks can be blocked, parried, or dodge rolled.
  • The shockwave cannot be blocked, parried, or dodge rolled.
  • Cannot turn around during the melee combo.
GroundShakerComboTutorial.gif

Strategy[edit]

Since Ground Shakers are invincible from the rear and can't be stunned, killing one almost always requires drawing aggro. The very first thing to watch out for is its avalanche attack. Unless the ceiling is low, do not dodge when you see the shine in the ceiling, but wait for the rocks to fall down before rolling. Fighting a Ground Shaker with uneven ceiling is tricky because the falling rocks can throw off your timing. Bait out the attack from as far away as possible if it's located in an uneven area.

Its melee attack is easily telegraphed and takes longer to attempt. The startup before its first swing gives you enough time to roll away, and the final shockwave attack takes much longer to come out. Even with slow weapons, it should be easy to hit it at least twice while it's charging up the shockwave. Some weapons with longer range can hit the Ground Shaker away from its claw attacks. Though it is riskier, the melee attack can be parried and deal notable damage or give the player a good position against the Ground Shaker if the player times their parries well, but the shockwave cannot be parried and must be dodged.

Generally, to deal with a Ground Shaker, first watch out for falling rocks. Then, either kill it from a distance before it can use its shockwave attack, or get very close to it while it's charging up the shockwave and roll behind it before it comes out. Because of its large size, you need to get as close as possible to roll behind it.

Ground Shakers are extremely vulnerable to ranged weapons since when they aggro the player, they will have to face them, causing them to expose their vulnerable front sides.

History[edit]

  • 1.2: Introduced.
Enemies

Zombie.pngZombie  •  Shieldbearer.pngShieldbearer  •  Undead Archer.pngUndead Archer  •  Grenadier.pngGrenadier  •  Oven Knight.pngOven Knight  •  Knife Thrower.pngKnife Thrower  •  Rampager.pngRampager  •  Failed Experiment.pngFailed Experiment  •  Runner.pngRunner  •  Bat.pngBat  •  Protector.pngProtector  •  Scorpion.pngScorpion  •  Disgusting Worm.pngDisgusting Worm  •  Kamikaze.pngKamikaze  •  Rancid Rat.pngRancid Rat  •  Yeeter.pngYeeterTBS  •  Jerkshroom.pngJerkshroomTBS  •  Thorny.pngThorny  •  Slasher.pngSlasher  •  Masker.pngMasker  •  Hammer.pngHammer  •  Sewer Fly.pngSewer Fly  •  Lacerator.pngLacerator  •  Slammer.pngSlammer  •  Shocker.pngShocker  •  Toxic Miasma.pngToxic Miasma  •  Buzzcutter.pngBuzzcutter  •  Inquisitor.pngInquisitor  •  Sweeper.pngSweeper  •  Festering Zombie.pngFestering Zombie  •  Corpse Worm.pngCorpse Worm  •  Impaler (Enemy).pngImpaler  •  Sewer's Tentacle.pngSewer's Tentacle  •  Spawner.pngSpawner  •  Corpse Juice.pngCorpse Juice  •  Bomber.pngBomber  •  Banished.pngBanishedTBS  •  Blowgunner.pngBlowgunnerTBS  •  Giant Tick.pngGiant TickTBS  •  Weaver Worm.pngWeaver Worm  •  Cleaver (Enemy).pngCleaver  •  Pirate Captain.pngPirate Captain  •  Weirded Warrior.pngWeirded Warrior  •  Swarm Zombie.pngSwarm Zombie  •  Corpse Fly.pngCorpse Fly  •  Catcher.pngCatcher  •  Caster.pngCaster  •  Golem.pngGolem  •  Dancer.pngDancer  •  Dark Tracker.pngDark Tracker  •  Corpulent Zombie.pngCorpulent Zombie  •  Cannibal.pngCannibal  •  Bombardier.pngBombardier  •  Automaton.pngAutomaton  •  Ground Shaker.pngGround ShakerRotG  •  Arbiter.pngArbiterRotG  •  Demon.pngDemon  •  Skeleton.pngSkeletonRotG  •  Myopic Crow.pngMyopic CrowFF  •  Cold Blooded Guardian.pngCold Blooded GuardianFF  •  Stone Warden.pngStone WardenFF  •  Apostate.pngApostateFF  •  Failed Homunculus.pngFailed HomunculusFF  •  Clumsy Swordsman.pngClumsy SwordsmanFF  •  Dastardly Archer.pngDastardly ArcherFF  •  Compulsive Gravedigger.pngCompulsive GravediggerFF  •  Guardian Knight.pngGuardian Knight  •  Lancer.pngLancer  •  Royal Guard.pngRoyal Guard  •  Infected Worker.pngInfected Worker  •  Living Barrel.pngLiving Barrel  •  Demolisher.pngDemolisher  •  Mutineer.pngMutineerTQatS  •  Armored Shrimp.pngArmored ShrimpTQatS  •  Agitated Pickpocket.pngAgitated Pickpocket  •  Gold Gorger.pngGold Gorger  •  Golden Kamikaze.pngGolden Kamikaze  •  Mimic.pngMimic  •  Merman.pngMermanRtC  •  Buer.pngBuerRtC  •  Werewolf.pngWerewolfRtC  •  Dire Werewolf.pngDire WerewolfRtC  •  Armor Knight.pngArmor KnightRtC  •  Axe Armor.pngAxe ArmorRtC  •  Throw Master.pngThrow MasterRtC  •  Vampire Bat.pngVampire BatRtC  •  Harpy.pngHarpyRtC  •  Bone Pillar.pngBone PillarRtC  •  Medusa.pngMedusaRtC

link True Ending Spoiler (5 BSC):   Magistrate of Death.pngMagistrate of DeathRotG  •  Screaming Skull.pngScreaming SkullRotG  •  Librarian.pngLibrarianRotG  •  Defender.pngDefenderRotG