Living Barrel
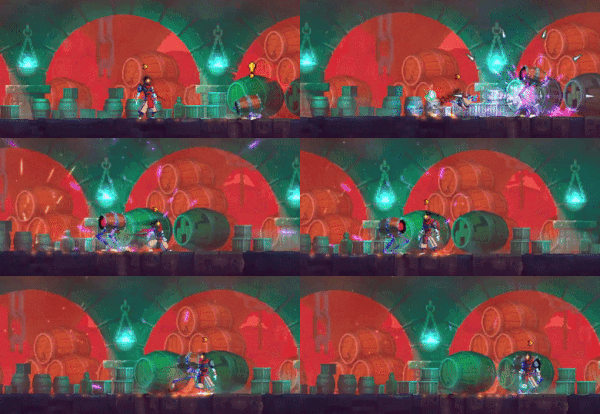
Living Barrels are a unique enemy found only in the Derelict Distillery. They function similarly to Kamikazes, as they can self-destruct to harm the player. However, they also have other unique traits that distinguish them from other enemies, such as being able to camouflage in with their surroundings.
Behavior[edit]
Living Barrels are hidden in the background and mimic regular barrels, but will reveal themselves when the player gets close enough. After that, it can chase after the player across platforms.
While undamaged, they shoot spikes. After they take any amount of damage, they begin to prime and chase after the player before exploding.
Elite Living Barrels have no attack pattern changes, but attack faster and are even harder than usual to stun.
Moveset[edit]
- Description: Launches five spike projectiles around itself, firing up, sideways, and diagonally.
- Can be blocked, parried, and dodge rolled.
- Description: When damaged, begins to flash red and start ticking. It will explode after a few seconds and chase the player until it does.
- Explosion can be blocked or parried.
- Cannot be dodge rolled.
- Once primed, it has a set lifetime before it detonates.
- Will briefly stop before exploding.
Strategy[edit]
Living Barrels are extremely aggressive when aggroed. They are fast and their spike attack deals a lot of damage, their explosion moreso. They make moving around in the Distillery very dangerous, as one (or more) can jump out at any minute. When a Living Barrel is near, wait for the right positioning to avoid getting hit by them.
If one has access to an item with burst damage, it can be used to kill them quickly before they explode. Otherwise, it's best to hit them once and run away from them. Running away is easier if there are multiple (safe) platforms to jump to and have a speed boost active.
If trying to use a on an Elite Living Barrel, it's highly recommended to disable it somehow so it can't interfere during the extraction once it has been sufficiently whittled down.
Notes[edit]
- Similarly to Infected Workers, Living Barrels can be baited into destroying the damaged walls encountered in the Derelict Distillery when they self-destruct.
Trivia[edit]
- This enemy, along with the rest of the content found within the Derelict Distillery, as well as the biome itself, were added in update v2.0, also known as the Barrels o' Fun Update.
- Their thin purple legs resemble those of Hammers.
History[edit]
|
Enemies
| |
|---|---|
|
• • • • • • • • • • • • • • • TBS • TBS • • • • • • • • • • • • • • • • • • • • TBS • TBS • TBS • • • • • • • • • • • • • • • • RotG • RotG • • RotG • FF • FF • FF • FF • FF • FF • FF • FF • • • • • • • TQatS • TQatS • • • • • RtC • RtC • RtC • RtC • RtC • RtC • RtC • RtC • RtC • RtC • RtC |


