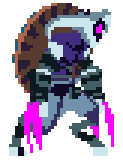
Thorny
Thornies are an enemy encountered in the Dilapidated Arboretum and Ossuary. One appears as an elite key guardian in High Peak Castle, occupying the green room.
Behavior[edit]
When at medium or long distance from the player, the Thorny will use its rolling attack. If it's close to the player, it may backstep or turn around after a startup when it takes damage from its front side.
Moveset[edit]
- Description: Attacking a Thorny with a melee attack from the behind will cause the player to take damage.
- Does not trigger from Dive Attacks and melee weapons that ignore shields.
- The
 Wrenching Whip will however make the player take damage on its third hit combo, as the player will perform a kick instead of using the whip.
- The
- The player will take damage when using the "Mario Jump" affix.
- Can be blocked or parried, but only with an
 Assault Shield or an
  Iron Staff's first hit in its combo.

- Description: Charges up then rolls forward, dealing damage on contact. Stops once it collides with something or when it reaches the end of a platform.
- Can be blocked, parried, and dodge rolled.
- If it collides to a wall, it stops momentarily with its front side facing away from the wall.

- Description: The Thorny will face the other way. This move is telegraphed like any other attacks.

Strategy[edit]
Thornies are best fought isolated to minimize the chance you accidentally hit its back. Thornies are a pain to deal with in general for melee, so it maybe be better to just avoid going into biomes they are in if you don't have the tools to counter them.
The easiest way to kill a Thorny is with ranged attacks, which it's completely vulnerable to. Alternatively, their rolling attacks are easy to parry with a shield, so you can easily bait them out of doing it and kill it while it's stunned from the parry. Beware that parrying the roll stuns them with their spiky side facing you, but this means that parrying them, then rolling to their other side and melee attacking them is always safe. If your only options are melee, it's best to bait out their attacks then hit them after its roll attack.
![]() Swarm is an extremely powerful counter to this enemy, as Thorny's attacks can only hit one biter at a time and its roll will stop if it bumps into one of them. Biters' damage will also tend to activate Thorny's turn-around counterattack skill, leaving it standing in place. The short cooldown of this skill allows it to easily distract and defeat them. Because of their spiked back, the
Swarm is an extremely powerful counter to this enemy, as Thorny's attacks can only hit one biter at a time and its roll will stop if it bumps into one of them. Biters' damage will also tend to activate Thorny's turn-around counterattack skill, leaving it standing in place. The short cooldown of this skill allows it to easily distract and defeat them. Because of their spiked back, the ![]() Assassin's Dagger becomes dangerous to use, unless the player is invincible. Weapons that move the player around heavily or have forward movement in their combo, like
Assassin's Dagger becomes dangerous to use, unless the player is invincible. Weapons that move the player around heavily or have forward movement in their combo, like ![]() Meat Skewer or
Meat Skewer or ![]() Impaler may be dangerous if they move the player through the Thorny.
Impaler may be dangerous if they move the player through the Thorny.
Trivia[edit]
- In the early days, Thorny didn't have any spikes on its back. Instead, it only had the sort of shield and was named "goat" in the game files. His attack was the same as thorny according to the spritesheet.
- Along with the fact that Thorny is called "SpikedSatyr" in the game files, this suggests that his design was inspired by the mythological Satyrs. Indeed, Satyrs were often represented as part goat with horns on their forehead, much like Thorny.
Gallery[edit]
Thorny early concept ("goat") from the game files

History[edit]
|